
Contents
We are sharing a photo editing tip that completely transformed our Lightroom editing.
Editing in Lightroom is by far, the most time-consuming part of our week. So anything we can do to speed up or efficiency and workflow, not only has a big benefit to our couples who get their images faster, but can also make a big difference to our profitability and sustainability as a business.
Almost every industry from health care to the kitchen will have specialized tools to help make a job easier and faster, so it’s almost crazy that the majority of us are still editing with a mouse and keyboard. And while there are a couple of off-the-shelf tools, Loupedeck and Palette Gear, they are generally lack customisability or they are expensive - up to $900 (!!!) for the ideal Palette Gear configuration. If that sounds like a lot, then keep reading, because I’m sharing step-by-step instructions for how to set-up your own editing console for less than USD$60/NZD$130, and how you can fully customise it to suit your workflow to get you editing like a pro.

1. Buy the Behringer X-Touch Mini
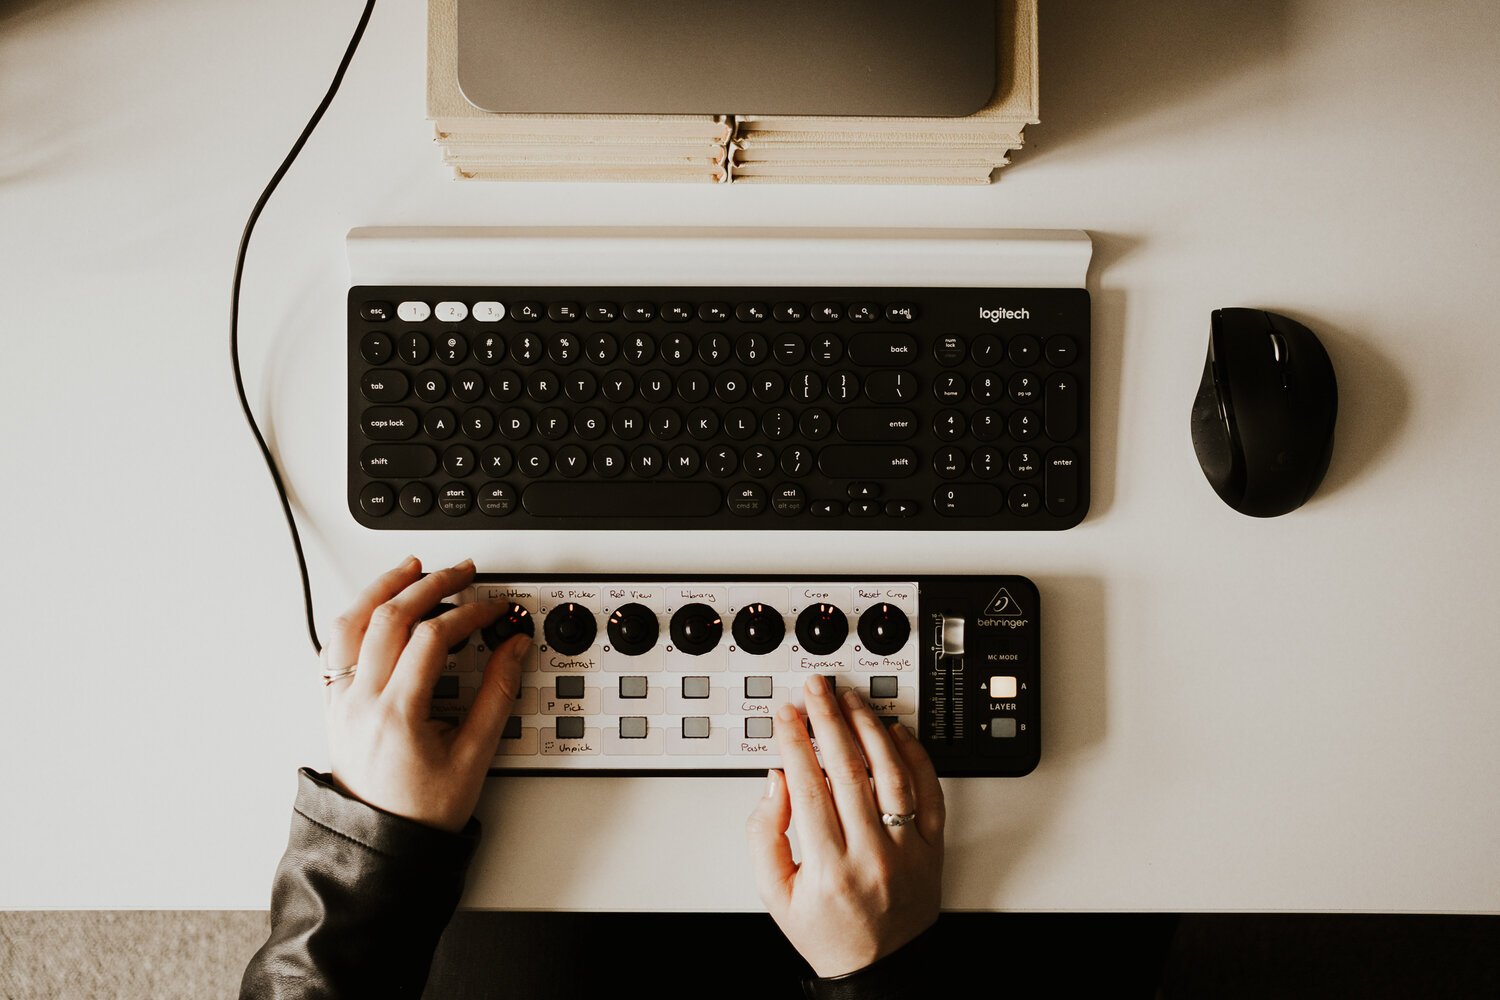
The first step, the key to this set-up, and the only item you will need to buy, is a midi-controller board. We use the Behringer X-touch mini, and that’s what I would recommend for you as well - it’s relatively cheap, has plenty of buttons and dials and is popular, so you are much less likely to have compatibility issues.
Universal midi boards are often used by DJ’s and sound mixers , but they are made to work with virtually any audio software with next-to-no setup required. This interoperability is part of what makes them perfect for photo editing. They plug into your computer via USB and because your Mac or Windows OS recognizes the midi board right away, we only need a small, free Lightroom plug-in called MIDI2LR to make the whole thing work.
2. Download and install the latest version of Midi2LR
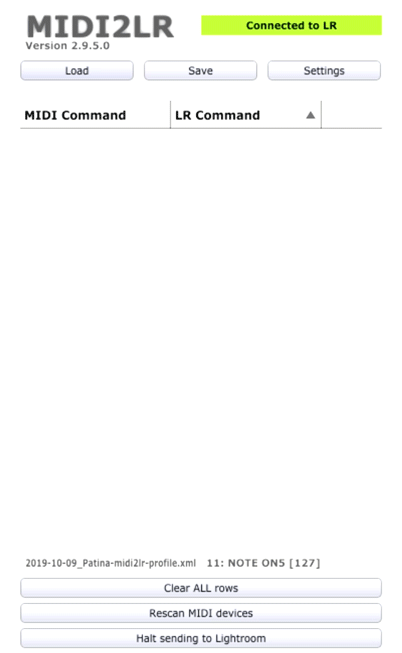
Midi2LR is a free Lightroom plug-in that lets your midi board 'talk' to lightroom. You can download and install the latest version from here: https://github.com/rsjaffe/MIDI2LR/releases/latest.
This plug-in is being constantly updated by the developer Rsjaffe, and it’s amazing service to the community that he is doing all this for free. So if you do find this app useful, I would highly recommend donating so that it continues to work with new Lightroom and OS updates.
3. Setup the Midi2LR plug-in
Note for Mac users: In Mojave and later versions of MacOS, there is an additional step needed to allow MIDI2LR to send commands to Lightroom. Read more here: https://github.com/rsjaffe/MIDI2LR/wiki
To get started…
- Connect the midi board to your computer
- Open lightroom
- The Midi2LR app will open automatically
- Press all the buttons on your midi board one by one
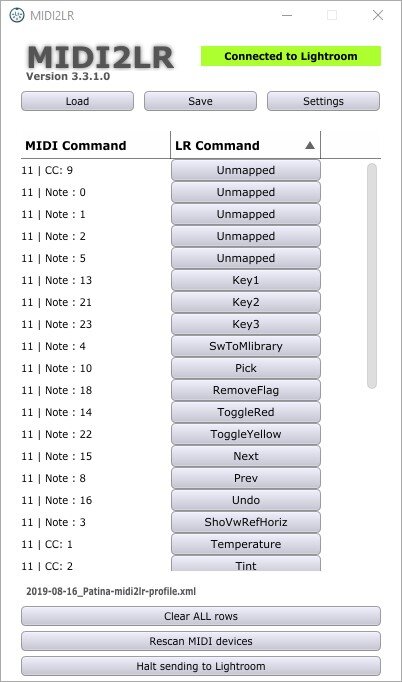
- As you press the buttons and turn the dials you will see them start to fill up the interface in Midi2LR.
Assign functions to each of the buttons, until you have something that looks like this:
Develop Presets. You can have 1 click access to your presets in two steps.
- In Midi2LR, click on the button you want to change, go to 'Develop Presets', and assign one of unused preset 'slots' to your button.
- In Lightroom, go to File ⇢ Plug-in Extras ⇢ MIDI2LR ⇢ Develop Presets. Find the same preset 'slot', and tell lightroom which preset you want it to apply when you press that button.
Read more here: https://github.com/rsjaffe/MIDI2LR/wiki/Plugin-Presets-Dialog
It might take a small amount of trial and error to settle on a layout that works especially for you. But one of the great things about Midi2LR, is how easy it is just to change the function of a few buttons if you need to (just remember to save your profile!). If you get stuck, the Midi2LR wiki has a list of all the possible commands and their functions.
To find our ultimate layout, I started with the most common controls we use e.g. temp/tint/exposure, next photo/previous photo, flag/unflag and crop. We decided on the layout of there and just added extra functions as we needed them. One thing I learnt early, was to split the most common controls between your left and right hands. e.g. control temperature/tint with the left hand, exposure with the right hand. That way you can minimize how much you have to move your hands, speeding up your editing even more!
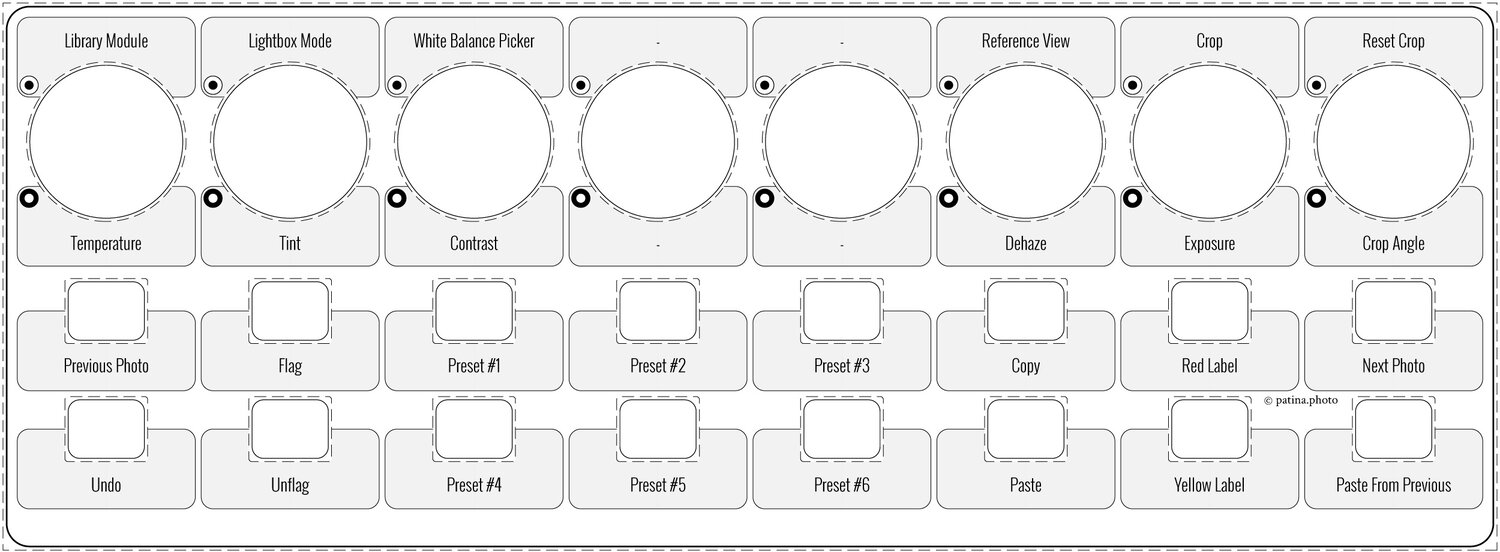
4. Print our quick reference guide template
To complete the look, download our FREE quick reference guide from our store —If you want to use the same layout as us (pictured above) then simply print out that version and you are done. If you have customised your own layout, we will also include a blank reference guide so that you can write the functions for each button to suit your layout.
You can then go even further and cut out the holes for the buttons so that you can tape to your board. Or just keep it on your desk, above or below your midi board so you can quickly see which buttons you need to press while editing.
Bonus: Troubleshooting & join the community
If you have any issues or questions while setting up your midi-board, or you just want to suggest feature improvements, then checkout the FAQ and join the community forum so you can ask questions and share tips.
Useful Links:
Frequently Asked Questions & Known Issues
Donate to Support Midi2LR Development